Sunday, March 29, 2009

DIY Starlyte

The Starlyte (designed by Zelph) is my favorite alcohol stove. It is easy to make so long as you can get the right containers. It's one of the safest alcohol stoves around (nearly spill proof). It works in the cold where pressurized alcohol stoves fail. And most of all, it is a K.I.S.S. stove (Keep It Simple Stupid). Just add fuel and fire it up. There is no priming, no "bloom" time, no hassle. In decent conditions you should be able to boil 2 cups of water in 6min. with under 1 oz of fuel.

If you'd like to make your own, I can email you some pretty thorough build instructions (leave me a note in the comments with your email address). I'll just mention briefly what you need to build your own.
1. Aluminum Wedding Favor Tin (Target had them on clearance recently)
2. Fiberglass Insulation (Home Depot, Lowes, any Lumberyard)
3. Fiberglass Cloth (Walmart in the Auto supply section, or most any autobody or marine shop)
4. Aluminum Window Screen (Same place you find the Insulation)
5. Hardware Cloth (for the pot stand, same as insulation and screen)

Top view. Inside the tin are layered, from bottom to top:
Fiberglass Insulation, Fiberglass Cloth, Window Screen

Side view.


You can experiment with different sizes. I bought the aluminum containers here. The largest is a small catfood can and it will hold enough fuel to boil a gallon of water - good for group camping.

Cook Systems

The snow is slowly melting and Spring is here. Granted, this is a Maine Spring, which means we're supposed to get a great deal of snow this evening. Soon enough, though, I expect the weather to warm... and out into the woods we shall go.

Some friends and I are planning a weekend hang (hammock camping) to test out some hammocks I've built - this will be the perfect opportunity to test out some of the Cook Systems that I've put together over the Winter.

My Standard Solo Set:
1. GSI Soloist Cook Pot and Bowl/Mug
2. GSI Telescoping Foon
3. Starlyte Alcohol Stove
4. DIY Windscreen and Pot Stand

This is probably the one I would take on most trips. It's very versatile, lightweight, and small. The Lid works both for the pot and the bowl, it has a built in strainer. The stuff sack is a water bag, and can be used as a camp sink to wash everything. The pot is made from "Halulite", a proprietary alloy that is as light as Titanium, but transfers heat better and more evenly.

Here is everything taken out, except the windscreen is still coiled up in the bowl.

Everything packed in the pot.

All packed up and ready to go. The whole system fits in the pot for transport.


Kmart Grease Pot Setup:
1. Kmart Grease Pot
2. Pot Gripper
3. Windscreen (not pictured)
4. ABS alcohol burner (w/ Supercat backup)

This is the best way to go if you're on a budget. The Aluminum Grease Pot sells for about $6.00. You can make both stoves for another $3.00 and a cheap pot gripper may run you $3.00. Add $1.00 for the windscreen for a Grand Total: $13.00. Pretty good for an entire cook system. The ABS burner slides right into a Supercat stove (not needed, but weighs so little that I consider it worth having as a backup stove). You can keep the strainer accessory with the pot or toss it for more weight savings. You'll notice I replaced the lid's handle - not so much for the weight but so that it would pack better.

Pot, strainer top, lid, ABS burner, Supercat, pot gripper.
Everything fits nicely into the pot for transport.

Wood Burner Set:
1. DIY Bushbuddy
2. Stainless Steel Cook Pot ("Sugar" cannister from Target)
3. Windscreen (not pictured)
4. Supercat (not pictured)

I like this pot for wood fire because Stainless Steel cleans easily. This pot can hold a lot, so it may be best suited for small groups (I do need to add a wire handle so I can move it safely when it's hot). The lid can be used for heating a cup or two of water for drinks. I like to keep a very light alcohol stove (fits in the wood stove for transport) as a backup for when the weather is nasty wet and dry wood is going to be hard to come by. The DIY Bushbuddy goes into a nylon stuff sack then into the cook pot for travel in order to keep the pot clean. Some tinfoil can be placed around the bottom of the pot to keep the soot off.


Minimalist Solo:
1. GSI Glacier Mug
2. Caldera Cone
3. Mini-Starlyte Alcohol Stove

This setup is a little too minimalist for me to use on a regular basis, but is still large enough to do freezer bag dinners, single servings of most meals, and hot drinks. The Glacier Mug is sized so that a Nalgene fits into it, so it can pack very small. The Starlyte is a tiny stove and the Caldera Cone can lay flat in the pack against the back panel, or coil around a water bottle.

Aluminum Bottle Stove

Yup... another alcohol stove. The Aluminum Bottle Stove (ABS) is a pressurized side burner alcohol stove. It works really well, is far more aesthetically appealing than most alcohol stoves, and is very sturdy (I can stand on mine without crushing it).

You can purchase commercial versions, the White Box Stove (it comes in a white box) and the B.I.O.S. from Tinny at Minibull Design right here in Maine.

Here's a side view of the stove and priming pan.
This version has fewer side jets than the commercial versions,
simply because I didn't have a small enough drill bit at the time.

Here's the top view. This is a double walled stove.
The inner wall is a portion of the neck of the aluminum bottle,
the outer wall is obviously made from the bottom of the bottle.

The Aluminum Bottle Stove is made from... you guessed it... an aluminum bottle. Emphasis on "bottle", it is not a can. Aluminum bottles are quite a bit harder to find than your usual aluminum soda can. These bottles have much thicker walls than soda cans, so the stove is really quite tough. It acts as it's own pot stand so you don't have to worry about misplacing extra parts.

If you're interested in your own, I do know that Budweiser makes aluminum bottles (these are sold mainly to be able to bring into stadiums - no glass allowed there). Mt. Dew has been making them lately as well but I have yet to find out where you can buy one.

Here's a fantastic Do It Yourself video from Russell the Weekend Adventurer. He's got a few great projects on his site, check them out. Look for the DIY section.

Saturday, March 21, 2009

Caldera Cone

I've been pretty interested in the Caldera Cone as an integrated windscreen and pot stand. So... I made one. Here is my first attempt. It is for my GSI Stainless Steel Glacier Mug. The mug best suited to boil 2 cups for simple solo dinners or hot drinks.

The Caldera Cone is a pretty brilliant idea. As a windscreen, it traps the heat from your stove much more efficiently than other windscreens, lowering your boil time. I made this one with 10" aluminum flashing. It takes about 2 feet of flashing to make a cone for most small to medium sized pots. Your pot must have a good, outward rolled edge to set on the cone. Pots with no outward lip will need separate pot stands.

I think the major drawback is that it does not roll up small enough to fit in the mug. It can be put in your pack flat, up against the back panel, or rolled around a water bottle and held with elastics. This particular mug is sized to fit a large mouth Nalgene into it, so it can pack pretty small.


As you can see, it gets hot. The first try proved that.
The cone unhooks at the seam and can lay flat or be rolled up.

The large cut out is for the handles on my mug.
The small holes along the bottom are to let oxygen in,
and at the top let out the carbon monoxide.


Here it is with the mug set in place.
I made a lid out of an aluminum bake sheet for it.


Here are all the pieces separated.
I'm actually using a smaller diameter alcohol burner now.

2Questions007 from Hammock Forums has made an excellent tutorial on how to make your own. Check out his video here:

Wood Gassifier Backpack Stove

Another of Scott's Do It Yourself backpacking stoves. After building somewhere around 20 different alcohol stove models I find myself becoming intrigued with wood burners for backpacking. I like the idea of not having to pack so much fuel, and there's just something wonderful about sitting in front of a real fire.

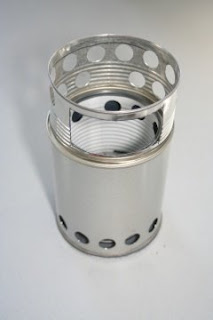
This is a double wall, wood gassifier stove. It is supposed to be an extremely efficient wood burner, making very little smoke and leaving very little ash. The principal is a little hard to explain, but it works by igniting the wood gas as the sticks and twigs burn. Cold air is sucked up through the bottom vents in the outer layer, it is heated as it moves up to the inner vents at the top. When you get the burn just right, it looks like flame jets are coming out of the top inner wall holes, but really it's just because that's where the oxygen mixes with the wood gas for combustion.

You can buy commercial models for about $100. Check out the Bushbuddy and the Bush Cooker. This one cost me about $5.00 to make and it is essentially the exact same thing.

I'm pretty excited about this little stove. It's smaller than I thought a wood burner would have to be; it fits inside many solo cook pots. I gave it a test run today and am pretty impressed. I boiled about 4 cups of water with a handful of small dead branches, broken up into pinky sized pieces. There is minimal smoke, if done right, though it does blacken your cook pot... I used tin foil to keep mine clean. I found I had to add a pinky sized twig ever 30 seconds or so.

I am liking the idea of having this as my main stove, but along with a small backup alcohol stove for when it's been pouring all day and I'm tired and just don't want to have to bother with finding dry wood for a fire. This way I won't have to carry as much fuel, but still have that safety net for really nasty weather.

Here's the whole thing set up.
The pot stand worked really well.


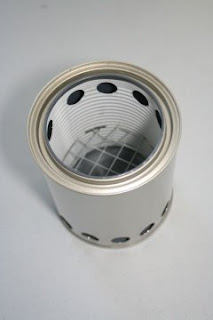
View of the inside of the stove.

Here's a look at the inside from the bottom.

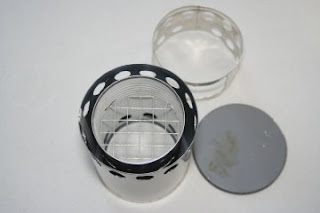
All the pieces separated.
The pot stand slides in between the double walls of the stove for storage.
The bottom was kept, the stove rests on this so as not to scorch the ground.

All packed up in the stuff sac I made for it.